After the disaster that was InfluxDB’s later versions, I decided it was time to move on from InfluxDB 1.11. For my evaluation, I tested three databases using real-world data and the actual queries I rely on. The versions tested were:
• InfluxDB: 1.11.8
• QuestDB: 8.2.3
• ClickHouse: 25.3.2
The test setup included two tables:
• price with over 7.7 billion rows (7,745,168,884)
• 1dayprice with around 13.5 million rows (13,580,249)
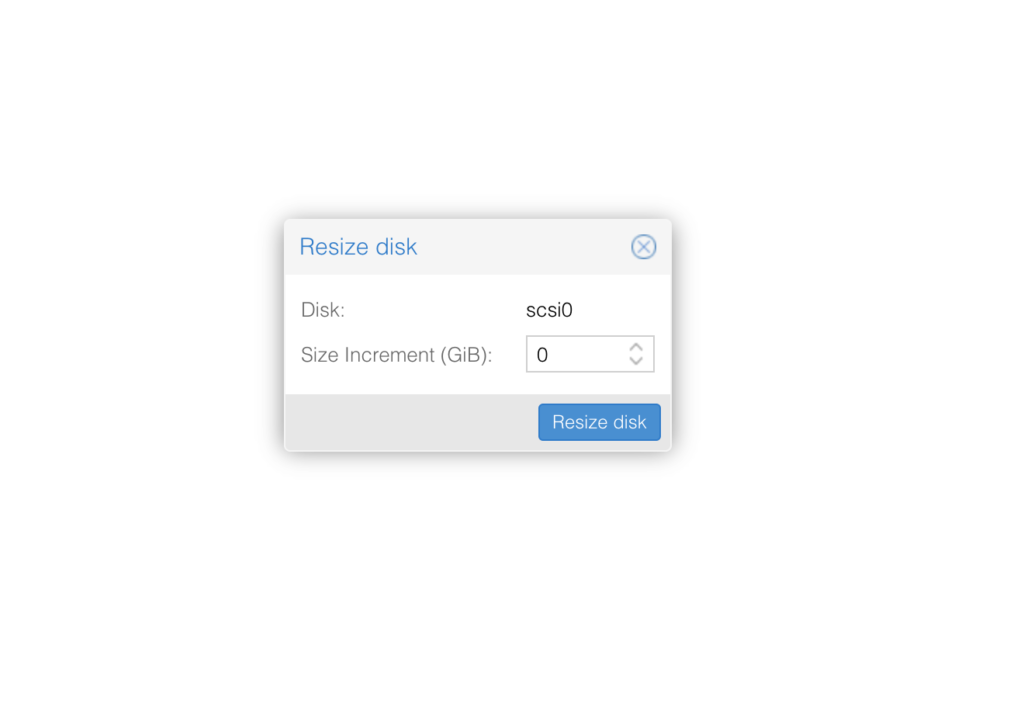
First of all we need to add space for this go Select VM -> Hardware -> Select Disk and click on Disk Action and Resize
Enter amount of GB you want to add for example 20 to increase size by 20GB click resize.
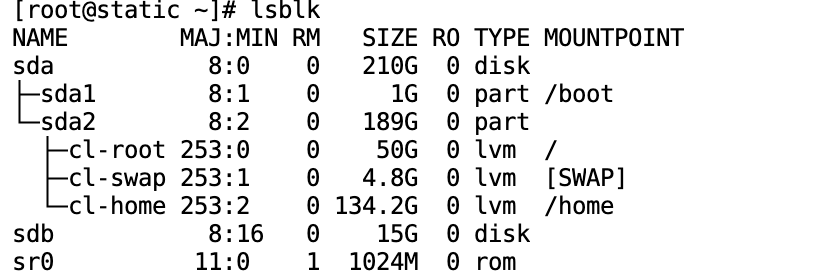
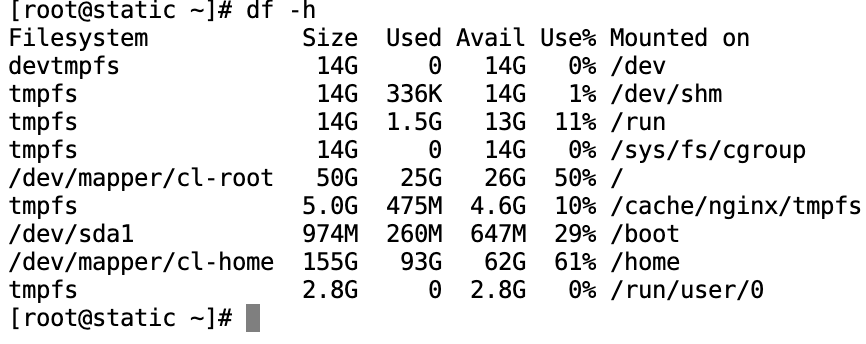
Now Login to VM and run lsblk command
We see here size has been changed but not on partition yet SDA is 210GB but SDA2 and SDA1 only have 190 total.
Run “parted /dev/sda” sda should be changed to your disk identificator of course. Then when in parted type “print”
I need to increase partition number 2 same as sda2, for this i run
resizepart 2 100%
then exit parted with typing “q”
Running again “lsblk” now shows sda2 have 209 GB
We need to increase LVM and thats all for this,
First run
pvresize /dev/sda2
now “lvdisplay” which will display something like this
[root@static ~]# lvdisplay
  --- Logical volume ---
  LV Path                /dev/cl/swap
  LV Name                swap
  VG Name                cl
  LV UUID                YTa6Na-XLow-cyM7-rEit-bC6q-LA3z-ivDxaN
  LV Write Access        read/write
  LV Creation host, time localhost, 2019-11-24 13:28:58 +0000
  LV Status              available
  # open                 2
  LV Size                4.82 GiB
  Current LE             1235
  Segments               1
  Allocation             inherit
  Read ahead sectors     auto
  - currently set to     256
  Block device           253:1

  --- Logical volume ---
  LV Path                /dev/cl/home
  LV Name                home
  VG Name                cl
  LV UUID                OJdJBZ-3c5a-1X2O-0iCm-4jzC-yNII-1ti2H4
  LV Write Access        read/write
  LV Creation host, time localhost, 2019-11-24 13:28:58 +0000
  LV Status              available
  # open                 1
  LV Size                134.17 GiB
  Current LE             34348
  Segments               2
  Allocation             inherit
  Read ahead sectors     auto
  - currently set to     256
  Block device           253:2

  --- Logical volume ---
  LV Path                /dev/cl/root
  LV Name                root
  VG Name                cl
  LV UUID                6bfmYc-CVfX-fkeP-C6Mf-hw0V-5093-4EC2R4
  LV Write Access        read/write
  LV Creation host, time localhost, 2019-11-24 13:29:01 +0000
  LV Status              available
  # open                 1
  LV Size                50.00 GiB
  Current LE             12800
  Segments               1
  Allocation             inherit
  Read ahead sectors     auto
  - currently set to     256
  Block device           253:0
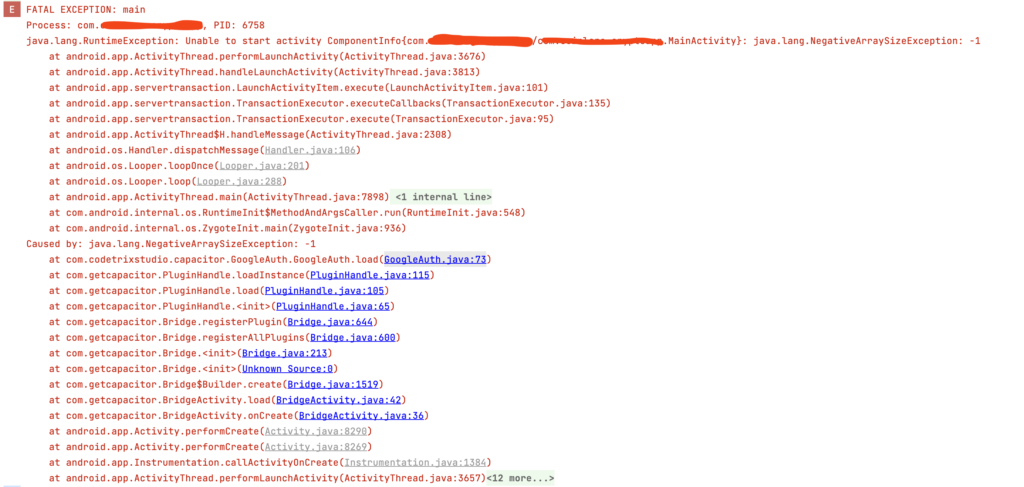
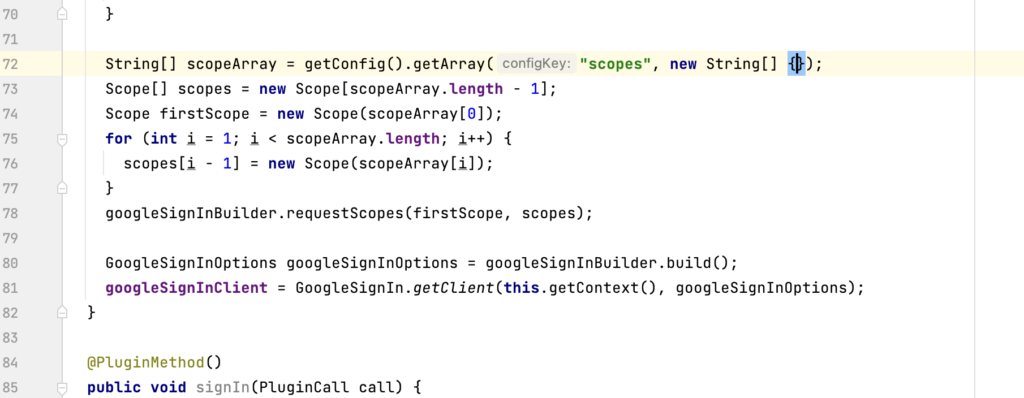
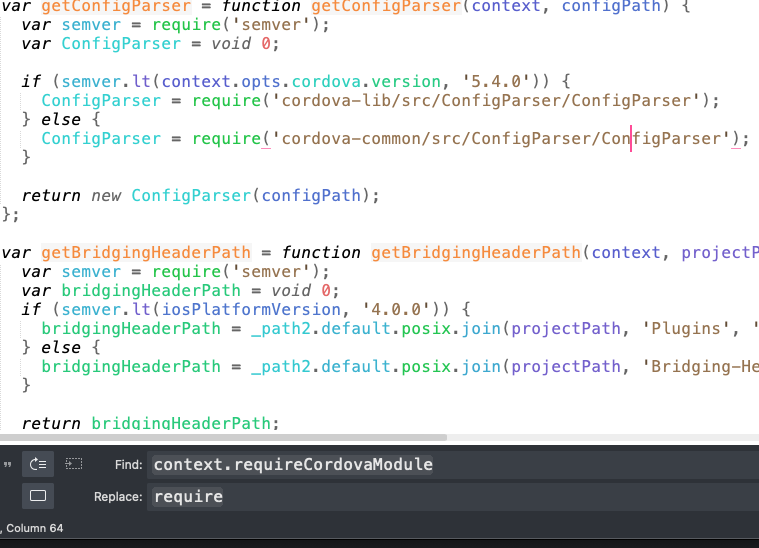
Executing script found in plugin cordova-plugin-add-swift-support for hook "after_prepare": plugins/cordova-plugin-add-swift-support/add-swift-support.js
Using "requireCordovaModule" to load non-cordova module "glob" is not supported. Instead, add this module to your dependencies and use regular "require" to load it.
CordovaError: Using "requireCordovaModule" to load non-cordova module "glob" is not supported. Instead, add this module to your dependencies and use regular "require" to load it.
    at Context.requireCordovaModule (/usr/local/lib/node_modules/cordova/node_modules/cordova-lib/src/hooks/Context.js:57:15)
    at exports.default (/Users/malhaz/Documents/Applications/IOS/main-last-coinlore/plugins/cordova-plugin-add-swift-support/add-swift-support.js:12755:22)
    at runScriptViaModuleLoader (/usr/local/lib/node_modules/cordova/node_modules/cordova-lib/src/hooks/HooksRunner.js:157:32)
    at runScript (/usr/local/lib/node_modules/cordova/node_modules/cordova-lib/src/hooks/HooksRunner.js:136:12)
    at /usr/local/lib/node_modules/cordova/node_modules/cordova-lib/src/hooks/HooksRunner.js:108:40
    at processTicksAndRejections (internal/process/task_queues.js:97:5)
[ERROR] An error occurred while running subprocess cordova.
One of the methods which worked is to go in plugins/cordova-plugin-add-swift-support open add-swift-support.js
Now search for context.requireCordovaModule and replace it with require
mysql_secure_installation

Securing the MySQL server deployment.

Connecting to MySQL using a blank password.

VALIDATE PASSWORD COMPONENT can be used to test passwords
and improve security. It checks the strength of password
and allows the users to set only those passwords which are
secure enough. Would you like to setup VALIDATE PASSWORD component?

Press y|Y for Yes, any other key for No: n
Please set the password for root here.

New password:

Re-enter new password:
By default, a MySQL installation has an anonymous user,
allowing anyone to log into MySQL without having to have
a user account created for them. This is intended only for
testing, and to make the installation go a bit smoother.
You should remove them before moving into a production
environment.

Remove anonymous users? (Press y|Y for Yes, any other key for No) : y
Success.


Normally, root should only be allowed to connect from
'localhost'. This ensures that someone cannot guess at
the root password from the network.

Disallow root login remotely? (Press y|Y for Yes, any other key for No) : y
Success.

By default, MySQL comes with a database named 'test' that
anyone can access. This is also intended only for testing,
and should be removed before moving into a production
environment.


Remove test database and access to it? (Press y|Y for Yes, any other key for No) : y
- Dropping test database...
Success.

- Removing privileges on test database...
Success.

Reloading the privilege tables will ensure that all changes
made so far will take effect immediately.

Reload privilege tables now? (Press y|Y for Yes, any other key for No) : y
Success.

All done!
First navigate to folder where you want to delete files, do’t use “ls”, “ls -la” as it can take lot of time before it will show result, so just make sure your in correct directory before running this command as it will delete all files in that directory
find . -type f -exec rm -v {} \;
Command will find all files one by one and will delete it.
If you want to delete only specific files for example only .jpg files
The lightweight and very popular text editor supports a lot of programming languages. You can use a free version or buy a license for 80$. I think it’s a must to have editor and successfully replacing Notapad++. Responsiveness and speed is a very big advantage when you have limited ram/cpu. If out of box functionality is not for enough you can search and install packages
Visual Code Created by Microsoft, Open Source free IDE, VS Code supports many programming languages and is lightweight enough to work on slow computers. It’s one of the best editors for JavaScript/Typescript but you will need to install extension to make it work well with PHP.
Netbeans Created by Apache Software Foundation it’s free and open-sourced. Great out of box PHP support, greate autocomplete function, for professional PHP programmer it should be great IDE but uses a lot of resources, it can be slow and not very responsive on a slow computer.
PHPStorm Costs 199$ the first year and also have free trails for 30 days. Considered as BEST PHP ide! It’s heavier then VS Code & sublime but it’s much more powerful than any other in this list. No matter on which PHP project you work, it feels like Phpstorm just understands your project and helping you to do things much faster. The only downside is price but if you can afford it, it’s best.
/usr/lib/python2.7/site-packages/requests/init.py:91: RequestsDependencyWarning: urllib3 (1.25.3) or chardet (2.2.1) doesn’t match a supported version!
Install Influxdb, and start it. After start we should create user After we should edit influx config file on CentOS /etc/influxdb/influxdb.conf Find and replace volumes in http section restart influx db Now in php to insert data