Resize Increase disks Space in Proxmox VM – Linux

Guide is for Proxmox,LVM,Linux

First of all we need to add space for this go Select VM -> Hardware -> Select Disk and click on Disk Action and Resize

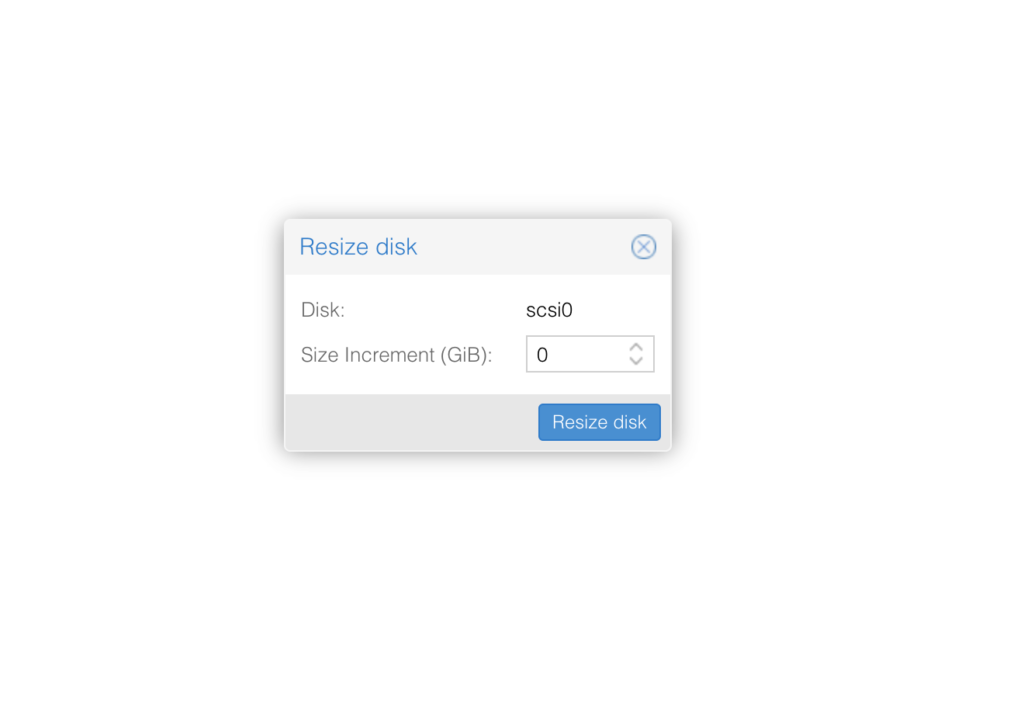
Enter amount of GB you want to add for example 20 to increase size by 20GB click resize.

Now Login to VM and run lsblk command

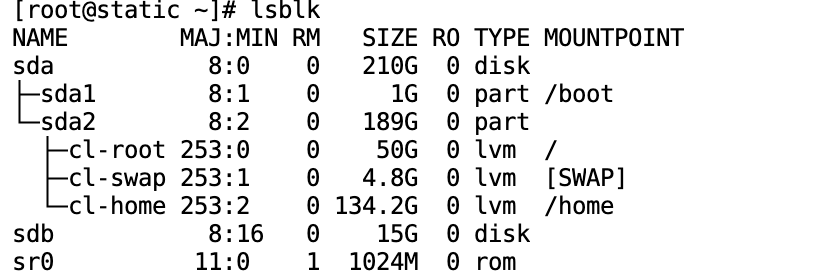
We see here size has been changed but not on partition yet SDA is 210GB but SDA2 and SDA1 only have 190 total.

Run “parted /dev/sda” sda should be changed to your disk identificator of course. Then when in parted type “print”

I need to increase partition number 2 same as sda2, for this i run

resizepart 2 100%

then exit parted with typing “q”

Running again “lsblk” now shows sda2 have 209 GB

We need to increase LVM and thats all for this,

First run

pvresize /dev/sda2

now “lvdisplay” which will display something like this

[root@static ~]# lvdisplay
  --- Logical volume ---
  LV Path                /dev/cl/swap
  LV Name                swap
  VG Name                cl
  LV UUID                YTa6Na-XLow-cyM7-rEit-bC6q-LA3z-ivDxaN
  LV Write Access        read/write
  LV Creation host, time localhost, 2019-11-24 13:28:58 +0000
  LV Status              available
  # open                 2
  LV Size                4.82 GiB
  Current LE             1235
  Segments               1
  Allocation             inherit
  Read ahead sectors     auto
  - currently set to     256
  Block device           253:1
   
  --- Logical volume ---
  LV Path                /dev/cl/home
  LV Name                home
  VG Name                cl
  LV UUID                OJdJBZ-3c5a-1X2O-0iCm-4jzC-yNII-1ti2H4
  LV Write Access        read/write
  LV Creation host, time localhost, 2019-11-24 13:28:58 +0000
  LV Status              available
  # open                 1
  LV Size                134.17 GiB
  Current LE             34348
  Segments               2
  Allocation             inherit
  Read ahead sectors     auto
  - currently set to     256
  Block device           253:2
   
  --- Logical volume ---
  LV Path                /dev/cl/root
  LV Name                root
  VG Name                cl
  LV UUID                6bfmYc-CVfX-fkeP-C6Mf-hw0V-5093-4EC2R4
  LV Write Access        read/write
  LV Creation host, time localhost, 2019-11-24 13:29:01 +0000
  LV Status              available
  # open                 1
  LV Size                50.00 GiB
  Current LE             12800
  Segments               1
  Allocation             inherit
  Read ahead sectors     auto
  - currently set to     256
  Block device           253:0

I want to increase “/dev/cl/home” for this

lvresize –extents +100%FREE –resizefs /dev/cl/home

[root@static ~]# lvresize --extents +100%FREE --resizefs /dev/cl/home
  Size of logical volume cl/home changed from 134.17 GiB (34348 extents) to 154.17 GiB (39468 extents).
  Logical volume cl/home successfully resized.
meta-data=/dev/mapper/cl-home    isize=512    agcount=6, agsize=6171648 blks
         =                       sectsz=512   attr=2, projid32bit=1
         =                       crc=1        finobt=1, sparse=1, rmapbt=0
         =                       reflink=1    bigtime=0 inobtcount=0
data     =                       bsize=4096   blocks=35172352, imaxpct=25
         =                       sunit=0      swidth=0 blks
naming   =version 2              bsize=4096   ascii-ci=0, ftype=1
log      =internal log           bsize=4096   blocks=12054, version=2
         =                       sectsz=512   sunit=0 blks, lazy-count=1
realtime =none                   extsz=4096   blocks=0, rtextents=0
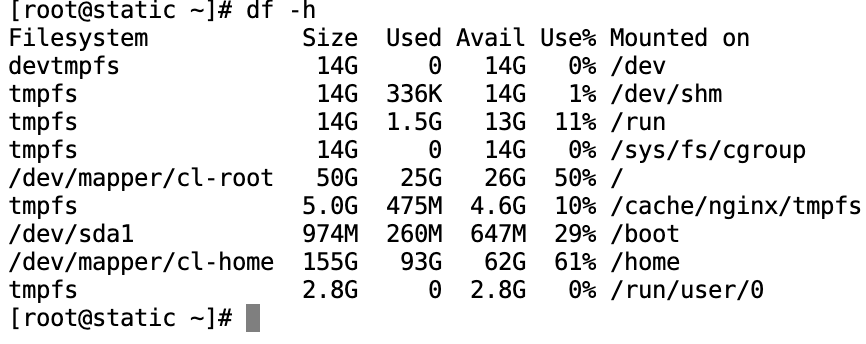
data blocks changed from 35172352 to 40415232

run df -h to see disk have increased

Fedora – No compatible source was found for this media.

sudo dnf -y install https://download1.rpmfusion.org/free/fedora/rpmfusion-free-release-$(rpm -E %fedora).noarch.rpm
sudo dnf -y install https://download1.rpmfusion.org/nonfree/fedora/rpmfusion-nonfree-release-$(rpm -E %fedora).noarch.rpm

After install ffmpeg

sudo dnf -y install ffmpeg

Restart firefox and try again to play videos.

Install Mysql 8 – Centos 8

sudo yum update
sudo yum install mysql-server mysql -y
sudo systemctl enable mysqld
sudo systemctl start mysqld

Now we need to set root password

mysql_secure_installation
 
Securing the MySQL server deployment.
 
Connecting to MySQL using a blank password.
 
VALIDATE PASSWORD COMPONENT can be used to test passwords
and improve security. It checks the strength of password
and allows the users to set only those passwords which are
secure enough. Would you like to setup VALIDATE PASSWORD component?
 
Press y|Y for Yes, any other key for No: n
Please set the password for root here.
 
New password:
 
Re-enter new password:
By default, a MySQL installation has an anonymous user,
allowing anyone to log into MySQL without having to have
a user account created for them. This is intended only for
testing, and to make the installation go a bit smoother.
You should remove them before moving into a production
environment.
 
Remove anonymous users? (Press y|Y for Yes, any other key for No) : y
Success.
 
 
Normally, root should only be allowed to connect from
'localhost'. This ensures that someone cannot guess at
the root password from the network.
 
Disallow root login remotely? (Press y|Y for Yes, any other key for No) : y
Success.
 
By default, MySQL comes with a database named 'test' that
anyone can access. This is also intended only for testing,
and should be removed before moving into a production
environment.
 
 
Remove test database and access to it? (Press y|Y for Yes, any other key for No) : y
- Dropping test database...
Success.
 
- Removing privileges on test database...
Success.
 
Reloading the privilege tables will ensure that all changes
made so far will take effect immediately.
 
Reload privilege tables now? (Press y|Y for Yes, any other key for No) : y
Success.
 
All done!

Support legacy auth methods

sudo nano /etc/my.cnf

Add at the bottom of the file

 default-authentication-plugin=mysql_native_password 

Restart mysql server and done!

sudo systemctl restart mysqld

Linux: /usr/bin/rm: Argument list too long

First navigate to folder where you want to delete files, do’t use “ls”, “ls -la” as it can take lot of time before it will show result, so just make sure your in correct directory before running this command as it will delete all files in that directory

find . -type f -exec rm -v {} \;

Command will find all files one by one and will delete it.

If you want to delete only specific files for example only .jpg files

find . -maxdepth 1 -name "*.jpg" -print0 | xargs -0 rm

It will search files with .jpg extension in current directory and will delete it one by one.

Install Steghide CentOS 6

Steghide is steganography tool to hide data in various kinds of image- and audio-files. first of all lets download RMP for centos

wget http://prdownloads.sourceforge.net/steghide/steghide-0.5.1-1.i386.rpm?download

after Download we can install it

rpm -ivh steghide-0.5.1-1.i386.rpm?download

if no error will be displayed then its ready but if error for example somthing like this

error: Failed dependencies:
ld-linux.so.2 is needed by steghide-0.5.1-1.i386
libc.so.6 is needed by steghide-0.5.1-1.i386
libc.so.6(GLIBC_2.0) is needed by steghide-0.5.1-1.i386
libc.so.6(GLIBC_2.1) is needed by steghide-0.5.1-1.i386
libc.so.6(GLIBC_2.1.3) is needed by steghide-0.5.1-1.i386
libc.so.6(GLIBC_2.2) is needed by steghide-0.5.1-1.i386
libgcc_s.so.1 is needed by steghide-0.5.1-1.i386
libgcc_s.so.1(GCC_3.0) is needed by steghide-0.5.1-1.i386
libjpeg.so.62 is needed by steghide-0.5.1-1.i386
libm.so.6 is needed by steghide-0.5.1-1.i386
libm.so.6(GLIBC_2.0) is needed by steghide-0.5.1-1.i386
libmcrypt.so.4 is needed by steghide-0.5.1-1.i386
libmhash.so.2 is needed by steghide-0.5.1-1.i386
libstdc++.so.5 is needed by steghide-0.5.1-1.i386
libstdc++.so.5(CXXABI_1.2) is needed by steghide-0.5.1-1.i386
libstdc++.so.5(GLIBCPP_3.2) is needed by steghide-0.5.1-1.i386
libstdc++.so.5(GLIBCPP_3.2.2) is needed by steghide-0.5.1-1.i386
libz.so.1 is needed by steghide-0.5.1-1.i386

Need to install all dependencies

yum install "compat-libstdc++-33.i686" "compat-libstdc++-33.x86_64";
yum install zlib-devel.i686;
yum install libjpeg-turbo-devel.i686;
rpm -ivh "http://dl.fedoraproject.org/pub/epel/6/i386/epel-release-6-8.noarch.rpm";
yum install libmcrypt-devel;
yum install mhash.i686;
yum install "libmcrypt.i686";
root@server [/tmp]# rpm -ivh steghide-0.5.1-1.i386.rpm?download
Preparing...                ########################################### [100%]
   1:steghide               ########################################### [100%]

now you can use it for example

steghide embed -cf in.jpg -ef out.jpg -p password
  • in.jpg is file where we want to add hidden data
  • out.jpg is ready file after add is completed
  • password is pass to encrypt data

PNG/JPG Images Optimization Recursively

Optimization of PNG and JEPG images, using two different utilities first one is jpegoptim which is used to optimize JEPG images to use it recursively and optimize all of images in directory and sub directory you can use this command:

find . -name "*.jpg" | xargs jpegoptim --strip-all --all-progressive

This will strip all data and make images progressive.

PNG images can be optimized with Optipng

find . -name *.png | xargs optipng -nc -nb -o7 -full

Top Hex Editors Linux

For manipulation of binary data there are tons of tools on Linux but I will try to list some of great looking GUI tools

Bless Hex Editor

Written in mono/gtk it can be used in any platform where mono and gtk can work, this is feature which is listed on main website

Efficiently working with large files with fast data rendering on screen.
Supports multilevel redo/undo operations.
You can customizable data views use multiple tabs use find and replace operations.
Export of data to plain text and html or you can use plugins for different formats.

wxHex Editor

Newer soft then bless hex with some new features it’s written in C++ and can be used on mac and windows also.

For speeding up rendering and work on big files it’s not copying full file to ram so it’s good for really big files, memory usage is low, how there site is telling it’s using 25MB while working on several files with size more then 8GB.

Allows to work as low level disk editor you can edit sectors in hex, has X86 disassembly support, allows process memory editing and much more, last release was in 2014 and project is still beta.

DHEX

Running on Linux, HP-UX, FreeBSD, NetBSD, MacOS X, IRIX and Solaris, it has diff mode which means you can open two files same time and compare it, also have several different themes so you can customize layout. last release was in 2012.

GHex

Hex editor for gnome desktop nice looking with simple design, no so many function but you can still edit files and save hex as html, so nice looking gnome hex editor.

Install NGINX Mod PageSpeed

Installing mod_pagespeed on apache is simpler then on nginx, here we should build nginx from sure with mod page speed, I will write down how to do this on ubuntu but this may work on any other distro

first of all we will need to install dependencies

sudo apt-get install dpkg-dev build-essential zlib1g-dev libpcre3 libpcre3-dev unzip

after lets set mod page speed version at this time it’s 1.9.32.4

NPS_VERSION=1.9.32.4;

now get mod page speed from github and unzip

wget https://github.com/pagespeed/ngx_pagespeed/archive/release-${NPS_VERSION}-beta.zip --no-check-certificate;
unzip release-${NPS_VERSION}-beta.zip;

we also need psol lib

cd ngx_pagespeed-release-${NPS_VERSION}-beta;
wget https://dl.google.com/dl/page-speed/psol/${NPS_VERSION}.tar.gz --no-check-certificate;
tar -xzvf ${NPS_VERSION}.tar.gz;

now we can download nginx configure and install it

NGINX_VERSION=1.8.0;
wget http://nginx.org/download/nginx-${NGINX_VERSION}.tar.gz;tar -xvzf nginx-${NGINX_VERSION}.tar.gz;
cd nginx-${NGINX_VERSION}/;
./configure --prefix=/usr/share/nginx --sbin-path=/usr/sbin/nginx --conf-path=/etc/nginx/nginx.conf --pid-path=/var/run/nginx.pid --lock-path=/var/lock/nginx.lock --error-log-path=/var/log/nginx/error.log --http-log-path=/var/log/access.log --user=www-data --group=www-data --without-mail_pop3_module --without-mail_imap_module --without-mail_smtp_module --with-http_stub_status_module --with-http_ssl_module --with-http_spdy_module --with-http_gzip_static_module --add-module=$HOME/ngx_pagespeed-release-${NPS_VERSION}-beta;
make;
make install;

now you need to activate mod add below code into nginx.conf(/etc/nginx/nginx.conf) below listen 80 line and create tmp directory and set user to it

pagespeed on;
pagespeed RewriteLevel CoreFilters;
pagespeed FileCachePath "/var/cache/ngx_pagespeed/";
pagespeed EnableFilters combine_css,combine_javascript,remove_comments,collapse_whitespace;
mkdir /var/cache/ngx_pagespeed/;
chown www-data:www-data /var/cache/ngx_pagespeed/;

after this you should have everything installed, but when we building nginx from source there is no upstart script, create file /etc/init/nginx.conf and insert this in it upstart script from nginx website

# nginx
description "nginx http daemon"
author "George Shammas <[email protected]>"
start on (filesystem and net-device-up IFACE=lo)
stop on runlevel [!2345]
env DAEMON=/usr/sbin/nginx
env PID=/var/run/nginx.pid
expect fork
respawn
respawn limit 10 5
#oom never
pre-start script
        $DAEMON -t
        if [ $? -ne 0 ]
                then exit $?
        fi
end script
exec $DAEMON

now you can start nginx using simple command

initctl start nginx

LAMP Server Arch Linux

This is tutorial how to install Apache,Mysql,PHP on arch linux.

First of all lets update arch linux:

sudo pacman -Syu

Now we can continue, install apache server:

sudo pacman -S apache
sudo systemctl start httpd

Mysql:

sudo pacman -S mysql

you will see something like this:

: There are 2 providers available for mysql:
:: Repository extra
   1) mariadb
:: Repository community
   2) percona-server

I’m recommending mariadb so click 1, before starting mysql we need to initialize the mariadb data directory and after start it:

udo mysql_install_db --user=mysql --basedir=/usr --datadir=/var/lib/mysql
sudo systemctl start mysqld

now to create password for mysql root user type:

sudo mysql_secure_installation

install php and it’s apache module:

sudo pacman -S php php-apache

open apache config file

sudo nano /etc/httpd/conf/httpd.conf

and comment this line

LoadModule mpm_event_module modules/mod_mpm_event.so

by adding # at start, after at the end of document add

#php
Include conf/php.conf

click CTRL + O and CTRL + X

sudo nano /etc/httpd/conf/php.conf

and add this lines

LoadModule mpm_prefork_module modules/mod_mpm_prefork.so
LoadModule php5_module modules/libphp5.so
 
Include conf/extra/php5_module.conf

click CTRL + O and CTRL + X

restart apache,

sudo systemctl restart httpd

now create php file and add into it:

<?php
 
phpinfo();
 
?>

navigate to this file, for example localhost/index.php

Now to install PHPMyadmin

sudo pacman -S phpmyadmin php-mcrypt

edit php.ini file and uncomment some needed extensions

extension=mcrypt.so
extension=mssql.so
extension=mysqli.so
extension=openssl.so
extension=iconv.so
extension=imap.so
extension=zip.so
extension=bz2.so

also search for base_dir and make sure it’s like this

open_basedir = /srv/http/:/home/:/tmp/:/usr/share/pear/:/usr/share/webapps/:/etc/webapps/

now open

sudo nano /etc/httpd/conf/httpd.conf

add at bottom

Alias /phpmyadmin "/usr/share/webapps/phpMyAdmin"
 
<Directory "/usr/share/webapps/phpMyAdmin">
    DirectoryIndex index.html index.php
    AllowOverride All
    Options FollowSymlinks
    Require all granted
</Directory>

restart apache

sudo systemctl restart httpd

you can access phpmyadmin using http://localhost/phpmyadmin

Thats all last step if you want LAMP stack to be started at start-up us this

sudo systemctl enable httpd mysqld

sudo systemctl enable httpd mysqld